Saturday, 14 February 2015

Just a quickie for 2015

Well, yet again it has been rather quiet on the blog front and I've decided to put that right with just a small posting.

The organ now has four manuals up and running.  It also has a stop tab rail (also working) for couplers and the like.  This is taking up more space than it needs to but I've deliberately left a large gap for manual 5 if and when I decide to put it in.

Since taking this photo earlier this week, I've done a bit of decorative work on the manuals although it's quite discreet.  Below each piston rail, I've installed a thin strip of wood which I've attached the felt strip to that goes along the back of the keys.  It just emphasises the design a little.  The sampleset is just the St Anne's, Moseley one as I was playing with setting up the tabs at the time.

This picture I posted onto Facebook a few days ago.  Tons of comments and lots of 'ooh' and 'ah' and 'MY GOD, WHAT THE HELL'S THAT?" in there but all of them were extremely enthusiastic.  I hope you are too.


Tuesday, 2 September 2014

Casework is coming on...

Hello dear reader (notice singular rather than plural?).

So, a very fast recap. 
I'm a musician, moderately good.  Play piano, sing and, importantly for this blog, am a classical organist who didn't practice due to access to pipe organs.  I found a computer programme called 'Hauptwerk' and was immediately bitten by the bug to build my own virtual pipe organ.  I started off with one, then two manuals then plus a pedalboard then three and eventually four.  However, I'm now at the stage where this monster has been created.  Always wanting more, that's me. 

The build project has been going on now since Captain Cook was a sea cadet and I've decided today to stop pretending that it'll ever be finished.  Whenever I think that the end's in sight, I think of something else that I can do to add to it and off it goes again.

During the last 9 months or so, I've had a lot of time on my hands due to being incapacitated and unable to attend work.  Don't worry, nothing very bad but what it did give me was TONS of time to get going with the organ. 

I did quite well in the early part of the year building the casework but then gradually ground to a halt as I really didn't know what I wanted to do with it although I knew I wasn't finished.  The big job I'm dreading is doing the finishing lacquer work.  It'll take FOREVER so perhaps I'm subconsciously putting off ever doing it.

This last couple of weeks I've had my head down below the keyboards and have concentrated on the nether regions (couldn't resist). 

The idea was to butch up the legs to make the thing look much more sturdy.  Although the legs were doing a fine job, they did rather look unfinished.  I wanted to have the legs looking much more robust.  This is what I ended up with...


Clearly the photo shows it in an unfinished state but it gives a really good insight into how it is put together.  The inside of the panel that you see is actually the leg itself.  The rest has been clagged on top of it.  The frame is simply four bits of veneered mdf glued on around the edge.  No need to mortise or anything like that as it is decorative.  The black inside edging is 18mm stripwood from B&Q that I spraypainted gloss black and cut to size.  The bottom skirting was slightly more complex but barely.  To have it further out there was plain mdf behind it to make up for the depth of the new panel edges.  Trusty old can of spray paint (lots of them too - I'm on number 4 and counting) and the mitre saw to give the edges and corners and you're pretty much there.  This next picture shows how it looked when it was finished.
 

The front of the leg detail was courtesy of good old B&Q again for some decorative moulding and spray paint.  The pieces at either side of that are offcuts of solid maple.  The whole setup not only looks good but hides forever, the raw and very unattractive edges of the mdf.  What started out being 18mm thick is now, measuring at the skirt 9cm.  It now does indeed have a much more solid appearance.

Clearly, the design carried on around the corner, look!


This picture handily shows off a few other things.  Firstly, I led the line right on to the separate unit of the toe stud rail.  I still want it to be separate for maintenance reasons.  This proved a little tricky but in order to get that out I ensured I was able to remove the skirting and lower portion of the panel.  Yes, they do have to be held in by screws but big deal: that can easily be tidied up after all.

Do you notice the colour of the pedalboard?  Not good is it?  I thought not anyway. 

I've been meaning to respray the pedalboard for ages and finally, when I got around to doing it last week, it had such gratifying results very quickly indeed.

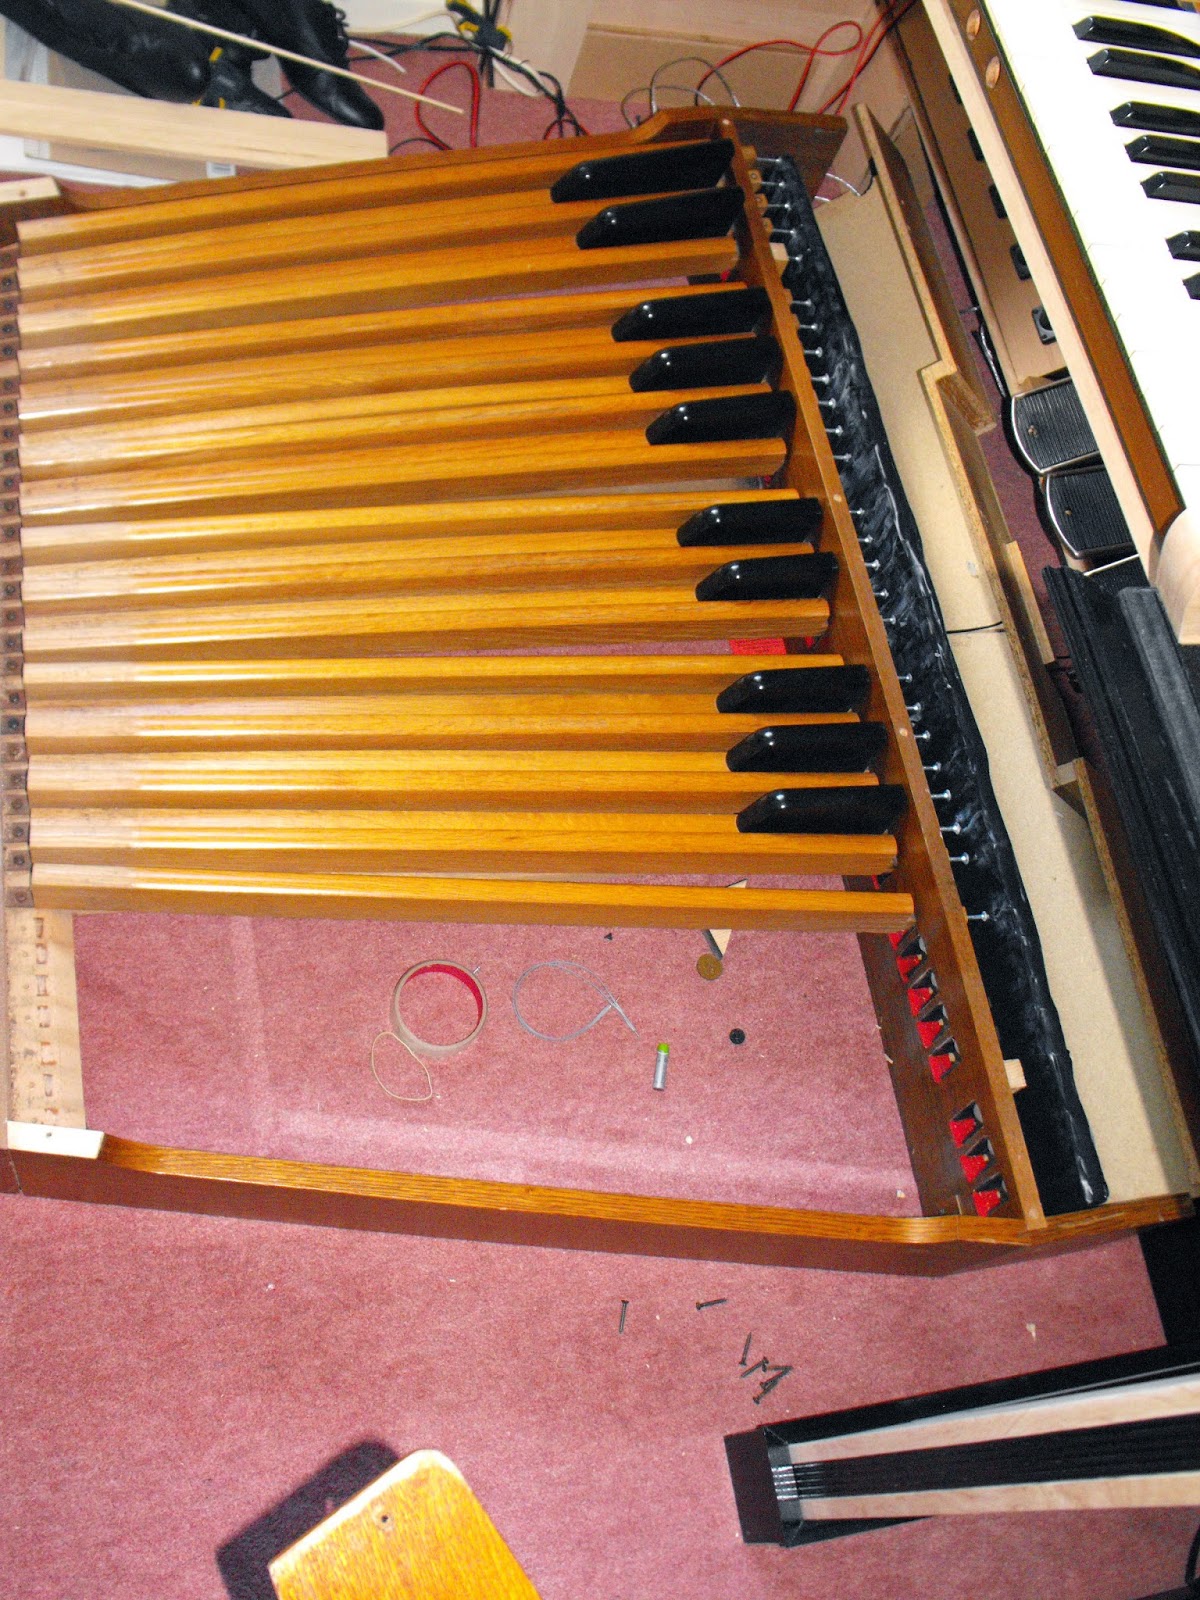
Here's how it was when it was partly disassembled in anticipation of a paint job;-

 
Do you notice the detritus that had fallen through the pedals?  I guess it's always worth pulling them out occasionally if you're looking for lost pens, pencils, staples, money, sellotape, escaped convicts, missing children or bankers' ill-gotten-gains from money laundering.  It's surprising what you find under there!
 
Here is the frame outside being repainted...
 
 
Shame I didn't do the same to the railing up to the kitchen door while I was at it!

This part of the project was very gratifying indeed.  Painting something black has instant results.  I loved how the felt on the pedal bushings really shows up.  And now, here it is all back together.  Very nice, I'm sure you'll agree.


There's lots more to follow but to be honest, I need to have a bath and it's already midnight!


Wednesday, 26 March 2014

An age but immense progress

It has been almost a year since my last post about the virtual organ project.  Why?  Well, to be honest, other things in life took over and the organ took a bit of a back seat.  It ended up being completely dismantled for a long time.

After a lot of thought, I decided against an all oak console because it was ultimately going to end up being a little too dark colour wise.  Instead after consulting my partner as to what he thinks (after all, he's losing a spare bedroom too), I decided on maple veneered MDF.

The MDF was bought for a total price of less than £200 for the lot.

I didn't use any plans for the build whatsoever.  I was, however, inspired by the console of Organorak who is a Hauptwerk user as well as a member of the website PCOrgan.  He sent me some details which were very handy primarily so that I knew how much MDF to buy.  His console can be seen here


As you'll see by the pictures, he has the pipe towers either side of the console.  Currently space doesn't allow that for me but there will be some eventually.


Above is my attempt at a music desk.  The edges are prepared to receive the ebony stringing I wanted to install to heighten the features in the wood grain.

Below is how it is put together although the biscuit placing was somewhat more accurate when it came to glueing up!


This picture below, shows the stringing being placed just to see what it will look like.  I was rather pleased.


As I didn't particularly make any proper measurements per se, it made for a somewhat interesting build.  If I'm being completely honest, perhaps the whole console is possibly 5% too large but hey, if you're going to build something to your own wishes you might as well overdo it a bit.  All I needed to know was how wide the pedalboard was, how wide each manual was, how high the lowest manual should be above the pedals.  The playing surface of the middle key should, according to the RCO specifications, be 29.5" to the playing surface of the pedal note D below it.  Plus, I needed to know the dimensions of the touchscreen monitors so I knew how big a hole I needed to leave.

After lots of playing with power tools in the garage I came up with this...


It's the music desk in the middle and the stop jambs either side.  I was rather pleased.

As time went on I became even braver and started playing with a router.  This enabled me to make a lot of progress as until then practically everything had been done with a cheap and cheerful table saw.  The picture below shows the top and bottom attached with tracks routered into them which enabled the stop jambs to fit into them... In the middle of our living room floor!


I'd placed three of the four manuals in there just to see how it'd look.  Plus, at the time the fourth manual was in dozens of bits awaiting me to veneer the key cheeks.

Speaking of veneering... 

It's dead easy.  I bought as much veneer as I needed online, ironed on a glue backing at the same time as glueing that to the surface to be veneered.  Very simple process.  It meant the four mismatched wooden manuals I'd managed to find would all look the same with enough work.

For those of you that don't know, because the organ is digital, you don't need to have proper stops like you see on old organs.  Instead you can use screens that you touch to draw the stops instead.  Good, eh?

I needed to fit the screens which proved to be very easy.  I removed them from their stands and made a very basic but sturdy frame for them to sit in.  Hopefully the following photo shows it better than I can explain it...


Where the screen would normally attach to a VESA bracket, instead I screwed that to the back wooden panel.  I really wanted the screens to have zero movement when pressed and this has definitely succeeded in stopping that from happening.  Yes, you can see daylight across the top.  That's 'cos the frame isn't installed as yet.

So, yet another picture of the top half of the console but this time with the screens installed and my ugly mug leaning on it to give an idea of scale.  I'm 6ft tall but leaning forward and resting on the instrument to prove that it won't collapse!


"AH-HA!"  I hear you cry.  "There's a toe piston rail there.  You never mentioned that!"

Yes, that's true.  The piston rail was built with a bit of hope and a prayer.  Considering I'm an atheist, it was best just to stick with the hope!  I knew that it had to span across the width of the pedalboard plus a little spacer down either side to make sure there was a bit of room for the electronic gubbins to have somewhere to languish.  I wanted the rail to be at a 45 degree angle as it was a very easy angle to work with and it felt comfortable when I was testing it from the organ bench.  As the pedalboard has a flat, level box at the back of it rather than the concave shape some people have had to work around, it was simple enough to make the whole rig just slide over the pedalboard.

How lucky am I to have so many toe pistons?!?!?!?!  I'd wanted a lot and had priced them up to buy new.  It would have cost me around £800 for the 21 I have so discounted that idea.  I've seen on many blogs and sites that lots of clever and imaginative folks have made very effective toe studs with all sorts of things including plumber's copper pipe and lids off jam jars.  I however, wanted mine to look like it was built with no expense spared yet in actual fact having been built on a budget of sorts.  Eventually, after a long wait and hunt on eBay, these pistons appeared, along with the little tags that go with them.  I won the auction and, in hindsight probably paid more than I should have done.  I think including shipping from the US as well as import duty, it came to £400 instead.

You can also see clearly the space I'd left for the three expression pedals I had knocking around.

Here's an arty shot of the pistons on the rail done by my beloved.  Lots of lovely bocha (if that's how you spell it).


Next up was building a table for the console to sit on.  Two sides both the same size, brace them together with a couple of 2x2s lots of brackets and screws and you're pretty much there to be honest.  Clearly the pictures are out of sync a bit now because of the magically disappearing toe studs.  This was just a dry fit to ensure it all did fit.  And it did!  Not only that but it was a lovely snug fit to boot!  


Now I knew that it was correct in width and height (remember I wanted the bottom keyboard to be a certain height over the pedals?  Well, this is where you do the sums to make sure it's the right height) I wanted to do a decorative bottom panel that would match the top.  This would add significantly more stability to the table too.  In the following picture you can see the panel in place but the stringing is still to be done.  Also I'd started to assemble the top too.  Have a gander..


You may notice that there's a bar across the underside of the table.  Well, that's one of the 2x2 braces but it also conveniently (serendipitously more like) hides the light that I fitted there to illuminate the pedals etc.

Something I've not discussed yet is the hinge situation.  There are loads of them.  I'm very aware that as this is home built, the likelihood of needing internal access to do tweaks or whatever is quite high.  With that in mind, the two stop jambs hinge forward allowing access to the back of the screens.  This is also where I've hidden the computer and lots of the electronics as there's quite a lot of room.  I'm also going to install a shelf or two on either side to take some of the speakers.  I'm making panels to cover the sides that will allow the sound to escape unimpeded.  Think of a radiator cover and the pretty patters that are cut out and you're not far wrong.  The music desk is also hinged upwards.  I'm not quite sure why to be honest but I guess it'll be advantageous if I need to get to the back of the manuals although they slide forward too if need be.  The other thing is that the whole instrument is 'knockdownable'.  By no means does that mean it's a portable organ but I know that there will be a time when it'll need to be removed from that room.  It comes apart in either three separate sections of top, base and pedalboard to say decorate the room and just move it enough to get behind it or it comes apart into six pieces but also needs to have the electronics and manuals removed.  That situation is really only in the eventuality of a house move though.

The eagle-eyed amongst you will have spotted a gap between the top of the piston rail and the bottom of the panel.  Don't worry, the top of the rail will be capped with a black lacquered piece of wood which will compliment the rest of the colour scheme.

So, the moment of truth as it is in its current state.  I'm very pleased with how it looks but there's still a long way to go and it's actually unplayable at present as it's not properly wired up.  You may also spot that the fourth manual is now in place but still not veneered.


Clearly you have to ignore the piles of crap that surround it!  

Did you see the difference in colour between the top three manuals and the rest of the console?  There is quite a marked difference.  What I've done there is begun the lacquering.  Thus far, none of the console has any finish on it (apart from the painted black shelves either side of the manuals).  The whole thing is going to be coated with five or six layers of lacquer each sanded between and then gradually polished down using finer and finer grits until I get down to probably 2000 grit wet and dry.  I'm hoping to go for a high gloss finish which will also include the black shelves.  This will, though, take a LOT of elbow grease.  It'll be worth it.  So, the key cheeks are a different tone purely because I was playing with the lacquer.  It looks really good.

You might just be able to see the carcass of the temporary expression pedal setup I had if you look to the right on the floor.  I've now attached all three to the rail.  Here it is.


I'm sure you've noticed how beautifully lit they are.  That's the light underneath the tabletop doing its thing.  I also particularly wanted you to see some rough edges that in time will be dealt with.  There is no frame around the recess, the pedals aren't boxed into their own enclosure, the crescendo pedal is too close to the bottom of the panel too.  That's totally fine.  Remember, it was all done without plans and instead was done by what feels right.  The bottom panel is in three pieces so the middle one just unscrews.  I'll take a couple of inches off the top of that section and it'll fit nicely.  I'm also going to get the pedals re-chromed and will replace the rubber.  I've no idea why the previous owner saw fit to stick holes in them but they had their reasons, I'm sure.

There's also something else that hasn't been mentioned.  Thumb pistons!  Yay!

I've made four new, matching rails.  They too have been spray painted black and will be lacquered to a gloss finish.  I just used off cuts to make them.  It's always worth keeping bits of wood that seem surplus to requirements.  Here, have a look at a small section of one of the rails...


A drill press or, in my case, my mother's mortising drill press with the square chisel removed, did the drilling of the holes with no problems.  The pistons are another set of eBay come-from-the-other-side-of-the-planet purchases.  I got 100 buttons, including postage from China to the UK for £20.  I'm planning on having 18-20 on each manual depending on the manual it is.

I've made a list of what I want each button to say and have found an engraver in a local jewellers who has the necessary machine to do the job very accurately and cheaply.  The little plastic ends pop off with a little persuasion so that's an easy job for me for once!  Pull 'em off, take 'em to the jeweller, pick 'em up and push 'em back on again.  If only the rest had been so easy!

What I did discover a few days ago was that now the console is unrecognisable from the first one and significantly bigger, lots of the wires aren't long enough.  VGA cables - too short, MIDI leads - too short, you get the picture.  So, longer cables bought all round.  I've now started to install those today.  I'm trying to keep the wiring relatively neat but I am still only 'mocking up'.  It'll all have to come apart down to the last screw anyway once I start lacquering...

No doubt there'll be more to follow in a year or so.

Thursday, 21 March 2013

Eureka!

Ok, I know it has been an age since I posted on here but to be honest it is an age since I got anywhere with the organ.  The last you heard was that I had four manuals, the pedalboard, a computer, a couple of monitors and speakers all rigged up.

Gradually I started tinkering... Fatal.  Cutting a long story short (too late) I gradually ended up with only one manual working and I had become less happy with the plastic keys so didn't really want to fiddle to get them running smoothly.  I did have four manuals that were wood core so got in touch with Midi Gadget Boutique and ordered the Hwce x2 bundle that would midi all of the wooden manuals together and be all singing and dancing.  However, after hours and hours of cleaning and then soldering I drew a complete blank after reading and re-reading the wiring diagrams.  I got in touch with Jordan there who gave me more information that I still didn't really understand.  Eventually, after six months of scratching my head, trying, failing, leaving it for a month and going round again, at last the penny dropped this evening.  I now know exactly what the problem was... ME!  The instructions were crystal clear yet I subconsciously was making them far, far more complicated for myself.  This morning I sat down with the most recent email and broke the info down, read it very closely and plugged it in... IT WORKS!  Hurrah!  I feel very pleased with myself but annoyed too that it took me so, so long to work out.  And there's me that is supposed to be clever.

Now there's just the first manual up and running, I'll be spending the next however long wiring up the rest now I know alll of that effort won't be wasted.

Sunday, 16 October 2011

Gradually getting there

Hello campers!

This week has been quite good regarding the development of the casework of the organ. As you'll already know from previous posts this month, I've started butchering the grade A quality oak I've got for the cabinet. The key cheeks for all four manuals are done(ish). They were all beautifully measured and amazingly it was correct even when I did it. The scrolling I did as a little decorative end was NOT easy. That took ages as it was my first time of using a scroll saw and putting oak that is quite thick through it with the wrong blade on (ahem) made for an interesting couple of evenings. I got there all I've got to do now is the glueing and screwing into place and then lots and lots of sanding to make it look lovely - which it will.

The next part of the project is to start on the cabinet. To be honest, I'm anticipating it being the easier part of the project. I've got most of the wood cut more or less to length so that's a start at least!

I've been doing a lot of research this week on using a router successfully. I borrowed my mother's as well as her router table (yes, my mother's, she's a funny girl!) and spent the other evening just getting a feel for them and just working out - without even turning it on - how it feels and how to attach the fence, bits and how to adjust the depth and things like that. I'm now the leading expert in the world when it comes to a router that's not been plugged in.

Youtube's fantastic for learning new skills. I've watched at least 3 hours' worth of tutorials on there which has been great - Very interesting indeed to be honest. It saves pratting about in the library for hours on end and then finding that the only reference book you can find was published in 1954 which would make it only slightly out of date in 1955.

Today's plans are to go out into the garage and have a few tentative attempts at using the router and if I'm really brave I might even knock up a side panel... if I'm REALLY brave AND LUCKY I might do two if they work out well. Well, there's nowt wrong whatsoever in optimism is there?

Wish me luck!

Saturday, 8 October 2011

Totally irrelevant but nice

Yesterday I spent several hours in the garage fiddling with the new scroll saw. I've now got about three blood blisters and a crushed finger that is oozing a yellowy white pus... so it was the same as it usually is when I've been doing my DIY!

I made a half-decent stab at doing the key cheek designs which I was relatively pleased with. I'm not going to post pictures of them as yet as I'm wanting to make them MUCH prettier than they are at present. The phrase 'ugly duckling' certainly springs to mind. I'll spend some time tomorrow tarting them up and if you're good; only if you're good, I'll post some pictures of the work so far. I'm happy with the results thus far. Not extatic yet, but the potential is definitely there.

Now to the totally irrelevant bit...

Martin and I decided a few weeks ago that we'd at long last have a civil partnership. As we've been together now for just short of 13 years we felt we'd served our time. So, we set a date of November 10th which is just a couple of days before the date we always celebrate as our 'anniversary' which is 13th. We're off down to London on the 9th, staying at 'The Capital' in Knightsbridge and dining at Le Gavroche that evening. The following morning, Kerry and Don, our witnesses are coming over from their hotel to have breakfast with us at our hotel and then we're all going off to the Old Town Hall at Marylebone where we're having the ceremony. To say it'll be small is an understatement as there'll only be 6 there... Martin, me, Kerry, Don, the Chief Registrar and the Registrar. That's more than enough! After the ceremony we four are going to The Wolseley for lunch. Martin and I are then going to see La Sonnambula at Covent Garden and will be doing a couple of other things that interest us like museums, 'pubs, photographs, sightseeing and the like. The following evening we're going to have dinner at our hotel and then on the Saturday we're back home. We're both really, really looking forward to it.

Today we went across to Newcastle to get new suits. Now I've got at least half a dozen suits that fit me or don't fit me depending on whether the waist is 32, 34, 36 or 38". Yes, really! Currently I'm at 32" and heading downwards. I've got a really, really nice suit I bought for my dad's funeral (he is dead - I'm not just hoping and jumped the gun a bit regarding the wardrobe choices) but sadly I've lost 2 stones in weight then (only sad 'cos the suit doesn't fit anymore!). So, new suits it was. I opted of a light grey three piece suit with a red/orangy coloured tie and a new plain 'posh' shirt with the double cuffs because I like to wear cufflinks. I did plan on getting new shoes too but nothing grabbed my attention so I didn't bother. Martin being Martin was very keen to spend 18p on teh entire ensemble. He ended up spending a lot more than me and I'd pretty much decided that whatever it cost I'd pay it. So, we're both suited and one of us is booted. Innit, sweet?

Tuesday, 4 October 2011

Hive of activity

It has been several months now since I wrote in my blog. For that I'm sorry. Why I'm sorry I've no idea as I'm pretty certain that I'm the only person out of 6,500,000,000 people on the planet who actually reads this. Ah, already I've digressed!


Anyway, I'm off work poorly bad (AWWWW). I've got Impetigo which is pretty minging but as I work in education and it is very infectious (the impetigo - not the education) I've been told to stay at home. It's the best illness in the world. You feel spotty and scabby and have to watch that you don't pick bits off yourself but you feel fine and are able to tackle some of the jobs you've been meaning to do for ages so that's a result then!


On the right, you can see the results of what I've been up to thus far this week. Yes, there's some extremely oversized key cheeks there, you're right. How high they look. Don't worry, I've not got an elastic tape-measure. I was playing.


The hawk-eyed readers amongst you will spot what looks like a different MIDI keyboard from the ones I've been using until now. It's absolutely right. I decided the other day that I wanted them all to match, to have no cracks in them and for them to actually have tidy wiring (Ahem) so I bit the bullet and bought four keyboards from Thomann, a German company that I can't recommend enough. They're the best company in the world. Fantastic quality, service, prices, the lot. I got four brand new midi keyboards, including delivery from Germany to the UK (3 days) for £236.00. Bargain or what? Anyway, I ripped them all to pieces so I could just have the keyboard and the midi bits rather than the bells and whistles and the little oompa rhythm section. Now, what you see above is the result of one of the recently gutted keyboards with a very rough-and-ready mock up of what the keyboard setup will look like. Impressive, I agree.

I looked all over to ensure the depth of the manuals would be right. Too deep and it would be too high (as in the picture) and too shallow and there'd not be enough space to get the keyboards in correctly thus forcing me to move each keyboard further back to accommodate. I'd end up stretching further than I need to if I did that. I measured my own (keyboards... dirty buggers), measured one or two other instruments I know and came to the conclusion that the correct height for a 'cheek' is 2.5" or 5cm whichever you prefer. With that in mind, I marked up the oak lengths I'd bought. Once that was done I decided that I wanted to have the cheeks thicker than they currently looked. They were only 1" thick which made them look a bit cheap so I doubled up each edge which made them look MUCH meatier. I'm glad I did that. As you can see to the left the cheeks do look much more butch now they're twice as thick.

You'll have seen lots of pencil marks and a pretty little drawing on the side of the cheek too. Well' I didn't just want a plain edge like most organs have, I like a bit of show. I looked around on the internet to find a design I liked. That took a LONG time as strangely, people don't seem to put close-up shots of the corners of their pipe organ keyboards on the 'web for the world to peruse. Eventually, I found a design that I like. If you look closely above the top bow outwards, there's a tiny step. That is to echo the top of the key so that the key can sit just a couple of millimetres below it and run parallel. How posh, eh?

The design looks a bit fiddly and to be honest it's dead easy. You've just got to be brave enough to trust your eye for detail. I actually got a bit of cardboard, a £2 coin and a £1 coin. I put them both on the card and drew round the £2 above the £1 coin and just followed the line around and ended up with that shape. Here, here's a picture that I hope will help. Also the template is 2.5" high... remember? Thought you did.


So, now I've got my cheeks and, as you can see from the money shot (ho, ho, oo, er) above, there's a step cut out of the bottom. There is but that's only on the inside one. The outside one goes along the entire bottom too (the save level as the foot at the front of the template). The reason is so that the keyboard can slide in on the little MDF base I've made but not told you about so that you'll not see it at all from the front. Clever, eh?

As I don't trust my freehand precision cutting with a jigsaw that's slightly less accurate than a blind man wielding an axe hoping to take the top off his boiled quail's egg, I decided that I'd best get a coping saw. After thinking further on the idea I opted for a scroll saw. I ordered one off eBay which cost me about £75 inc. P&P which I was very pleased with. I'll use it a lot as I'm planning on doing several fretwork projects in the future. Yes, indeed my grandmother is going be be receiving the world's worst attempt at a bit of fretwork on a manky panel that you hang on the wall for her Christmas present and she's going to like it too... or else!


Tomorrow's plan, therefore, is, presuming the saw arrives, to cut out the inside (stepped) cheeks, screw them to the outside cheeks and then cut the detailing for the ends on the scroll saw. Ideally, I'll be able to at least knock up the four keycheeks with maybe one keyboard attached. If I can I'll put up a piccy or two of the setup. I'm determined to get that part finished by the end of next week so I can transplant the new keyboard setup into the bedroom and demote the four keyboards I have been using to the garage in anticipation of a quick journey to eBayland... or maybe two of them can go to work in my office to practice with. We'll see. The former I'd guess. My boss has already told me that he doesn't like my harpsichord that I took in. Damnitt!

Monday, 11 April 2011

It all happens together

The last time I checked in I was talking about the computer being ordered. It arrived! Hurrah! Very stylish piece of kit... until... It kept switching itself off and rebooting time and time again. I wasn't fussy on sending it back as we'd go through the 'did you do this? Did you try that? Can you wrap it up and put it by for our delivery man to turn up somewhere between now and 2014? You know the gist. Anyway, I thought that it couldn't be too much of a problem so I did lots of research and came up with a faulty ram stick. I contacted the guy who supplied it, he agreed wholeheartedly. I took each one out in turn and all of a sudden it was working 'champion' once one stick in particular had been removed. I've just got to pop it into the post and he'll send me a replacement. Dead easy. Then... Martin went out for a day mooching about in Carlisle with his mate, Steve. When Mart came back, he mentioned something about a sound system that Steve was wanting to put onto Ebay. Of course, I've been sort of looking for something now I know what outputs the computer has. I gave him a ring and to my HUGE joy, it was exactly the system I'd been coveting but not wanting to pay full price for or buy off the internet. He did me a really good deal. Steve being Steve, I knew that they'd be in the same condition as he got them so I had no worries whatsoever about condition. Brill, I've got the Bose Acoustimass 5 series iii. Wonderful. Now, I'll have to get an amp to run it through. Researched again. They're expensive. Hmm, not this month. You know what I'm like. I thought 'well, you could be dead next month' so out to Peter Tyson's (a local electrical/audio/visual company). I got what I wanted with best part of £100 knocked off. Still cost me £200 mind so don't think it was bargain of the century. This evening I've been faffing around AGAIN. Wiring up here, wiring up there, moving this here to there and back again trying to get it all to fit. It looks pretty hysterical at present as there's a lot going on but it sounds absolutely fantastic. My next project is getting a video up on this blog of me playing. If you're really lucky I'll even take my gloves off!

Monday, 28 March 2011

Another big day

Yes, I know, ages since I was last in but in fairness, it has been a bit of a busy time. So, the other day I decided that there must be a way where I can have the organ set up in the bedroom AND have room for the bed settee to be open at the same time. I've got sick of hauling it in and out of the house (as Martin said I would). A lot of jiggling, juggling, mingling and cajoling got it sorted out and now, I've got to say, that it's great. Lots of floor space and it's nowhere near as dominant as it once was. I've found myself a bit of spare money (at last) and today I ordered a computer that'll be exclusively for the organ. It's perfect as it's simply memory and processor. Not a great deal more to it than that really. I'm not going to bore you with the spec' but the gist of it is... 16GB memory 2TB hard drive Lots of high end stuff that come for a low end price. I've been looking at this for ages so am very happy with the purchase. I just can't wait for it to get delivered now! I'm very pleased that it has lots of audio output capabilities as the next thing for me to try to get sorted is the sound system... And on it goes again!

Sunday, 2 January 2011

Nearer and nearer

It's the beginning of the New Year. All of the celebrations are over. The recycling bin is full of empties. I think the bin men will develop hernias just carrying our bottles let alone the chocolate wrappers. The decorations came down this morning as did the tree. The living room is looking particularly bare... and unusually clean!

Why am I talking about the beginning of the new year? Well, it means that the anticipated arrival of the Hauptwerk software is a little closer on the horizon. I'm very keen to see what you get and all that jazz. More's the point, I'm keen to receive the upgrade sometime soon. I'm very worried (well, no, not worried at all but interested) that there's no reverb. I like a bit of reverb. It sounds so unrealistic when you're playing it in the back bedroom without reverb. I know you can get 'dry' samples or 'wet' samples or whatever but I'll not be buying a new organ for the software for a little while as yet so it'll be good to have that to play with... Once the hand's a bit better at the end of Jan.

Not a lot to report, really. As you read!

Thursday, 30 December 2010

keyboards galore

So, after the last update I was thrilled to announce that I'd got the swell pedals to work as they should. I was a very happy bunny. I had a couple of days worth of playing the instrument which was marvellous. I'm saying lots of nice things about it and building it up aren't I? I bet you're expecting me to bring it crashing down with a comment about it all going pear-shaped after blowing up or something. Well, sorry to disappoint but it was still fine.

We had a couple of good friends over for dinner a couple of nights ago. As these friends are such good company (that is, they like to get plastered too) I dismantled the organ to take it out of the bedroom (that's what the room is in all honesty) so I could pull out the sofa bed in case they ended up with too much booze in their systems that they'd need to stay over... they did!
Oh, already I miss it. The poor little thing comes apart in several very large pieces. Two lots of two manuals, two touchscreen monitors, the desk the bench and the pedalboard. Not really difficult to dismantle but when you're still trying to get your hand strengthened after a carpal tunnel operation it's not quite so easy. I managed to get pretty much all of it out to the garage and it is now strewn across the grand piano in there.

There is some VERY exciting news about the organ though... I've actually bought the Hauptwerk software at last. HURRAY!!!!!!!!!!!!!!!!!!!!!! Hauptwerk are doing a very good special offer over the Christmas period which is a bit late for any of you to benefit from now. The version 3.3 has been reduced by about 20% with a free upgrade to the version 4.0 which is due out in a month or so. God knows how long it'll take for the product to arrive as it is winging its way from Canada I believe. I'm also certain that I'll be stung by the VAT increase from 17.5% to 20% in the next few days. We've got to get the national debt down somehow I suppose... those of us who've still got jobs that is! C'est la vie. I think that in total it'll cost me £420 or somewhere in that region. I'm not even putting that money into the British economy anyway if it's coming from Canada... Hmm, didn't think of that!

The organ will have to stay in the garage for a little while now which is really killing me. I start to build up the strength in my hand and start playing a bit more confidently with not a lot of trouble, I buy the software I've been coveting for months and then get an appointment for my second operation for the 4th January. That means at least the beginning of February before I can consider playing again. BUGGER! What irony is that for you?

I was rooting around on Ebay again tonight. I've seen another couple of keyboards that would be great to convert. We'll see... I've already got 6 now. Did I mention the wooden ones I bought a few months ago? They're very nice although I might have to re-list them. They cost me £90 which was a good price but it'll cost me about £500 for the necessary hardware to convert them. I might let them sit in the garage for a few months to see if anything comes up. Ideally they'll be part of the main organ for the home instrument. I'd rather add them and take the keyboards off the top off the current stack of four as the colour doesn't match (as shown on the picture in the first posting).

I'm still not happy with the organ though. The thumb pistons don't work at present. They're all wired up correctly; that I know as I did have them working a while ago but then had to dismantle it and then forgot how I'd configured it when I put it back together!

Do you know what thumb pistons are? Well, here, have a butcher's;-


Now you know what they look like I'd best explain what they do and where they are. To be honest,they're simply pre-programmed combinations. The easiest way to explain it is to compare it to your car radio. You have your favourite stations tuned in already so that you just push a button and there they are. These do exactly the same job - except you don't get 'The Archers' if you press number 4! They pull combinations of different stops out all at once instead of having to pull them out individually. The pistons are easily reached as they're positioned directly beneath the keys on each keyboard. If you closely look on the picture you'll see the black notes of the keyboard below and the underside of the keys above.

That's it for now. You know when you're sure there's something you've forgotten to say? Why am I getting that feeling very strongly at present?

Oh, and one other thing... While I've been writing this the clock has ticked past midnight. That means that we're into the very last day of 2010. I'm sure that my next post will be in 2011 so with that in mind HAPPY NEW YEAR! Hope it's a good 'un.

Friday, 24 December 2010

Christmas Presents

So, 'twas the night before Christmas when all through the house, not a creature was stirring... Except Stuart cheering 'cos he finally got the swell pedals to work! Yes, at last the big day arrived.

True, the big day of everything working well did arrive about 4 days ago but I've been so distracted by making sure it wasn't just a fluke and that it was totally reliable when it came to powering up, unplugging, plugging, powering down and the like that I didn't want to tempt fate by writing about it on here only to find it didn't work anymore!

The clocks have just started to strike midnight which does indeed mean that it is officially Christmas Day 2010. Merry Christmas everyone. I really do hope you didn't spend too much on my gift.

I'll post further photos sometime soon. Who knows, I might even manage to upload a sound file or even more excitingly a VIDEO! I'll be just like Norma Desmond "I'm ready for my close-up, Mr. De Mille!

S

Wednesday, 15 December 2010

POTS Potential

Well, further developments - although only ickle ones.

Swell/crescendo pedals. That's what we're talking about now. Bet you're excited aren't you?

What is a swell pedal. It's dead easy, it's a volume pedal. Nowt more to it than that really. The crescendo pedal, however is a little more complicated. That adds more stops the more you push it forward. So if it's right back, it's very soft but if you push it all the way forward you get 'full organ'. It's basically a quick way of pulling out all of the stops. The pedals just look like sewing machine pedals. There are pictures further down on the original posting.

Now you know all about that I can explain what I'm on about. Because the pedals are part of a virtual instrument they also need to have midi connections. Sent off to Ron Coates to do the complex stuff, they arrived looking all lovely. That's where it all started to go downhill! I've been trying to configure them to the organ setup I've got and have managed to get nowhere. I do know that they're sending the signal but it isn't being recognised by the software. Oh well, keep trying. I'll check back in with you once it is done shall I?

If I don't get chance to say it before, 'Happy Christmas for 2010!'

Tuesday, 30 November 2010

The early joys


Hello, dear reader.

I suppose I'd best start at the beginning.

Many years ago I was a very rubbish church organist. However, I did have style so managed to make a modest living at it. It was lots of fun. I loved a good funeral but strangely, I hated weddings. My theory is that it's very unusual for the corpse to arrive late whereas a bride...

After moving across to Cumbria in 1999 I sort of stopped playing apart from very occasionally helping out in a church or two in Carlisle. Of course, as in most places, organists (or even pianists who can busk a bass accompaniment with the pedals) are pretty few and far between. After lots of thought I decided that it wasn't worth me playing classical organ any more as what folks expected in return outweighed both the pleasure and the remuneration... £10 offered for two hours on a Sunday morning with a twenty mile round trip? Not for me, ta! Especially as I'm a great big atheistic heathen to boot!

A few years go by and of course the enjoyment of organ music hasn't gone away - nor has the want to play. I accepted a post as an organist in a tiny little parish church. I only did it for a few weeks until sadly there was a huge personal family crisis that took me out of normal life for well over a year.

It was during and after the 'recovery' process that I started really getting into YouTube. Now this, to me, was fantastic. It was here that I looked at organ videos and eventually stumbled across Hauptwerk and MidiTzer. WOW!

As soon as I heard what the technology could do (in 2008 when I discovered it - yes, I'd been living under a stone 'til then) I wanted to start to use it. I mean, what could be better? Get the stuff together to build a basic virtual pipe organ at home? "Wuhoo!" as they say in the Houses of Parliament. I had a Yamaha keyboard that I use for concerts. That was a good start. Don't want to spend money until I'm sure, do I? So, I downloaded the free version of Hauptwerk and plugged my usb doo-dah in and off I went... or not. It's at this point I have to tell you that I'm TERRIBLE with technology.

Did I check the cable?
Yup.
Did I check the other end of the cable?
Yup.
Did I check that I had the right configuration on the Hauptwerk settings?
Yup.
Did I know what I was looking for when I did it?
Nope.

After lots of argy-bargy I flicked the MIDI button on the digital display of the keyboard, pressed a key and STILL nothing happened. "Aah", I thought. I drew a stop with my mouse and it worked! HURRAH!

Now, this setup was acceptable for about 24 seconds. I didn't want to be clicking the mouse pad on my laptop every time I wanted to change registration. However... Christmas was just around the corner and what with my birthday being only a fortnight before then I felt brave enough to ask 'Mother Dearest' if she knew what she wanted to get me as gifts 'cos if she didn't I wanted an Oxygen 61 thingy keyboard. So, I now had two keyboards and one of them now had the capability of changing pistons with one push of a button right above the keys. RESULT!

I was really enjoying this little setup. For a good few weeks but I was very aware of a couple of problems.

1. I was only using the crappy monitor speakers from our old PC.

2. The alligator double keyboard stand, although solid enough, wasn't the most appropriate thing as jumping from the great manual to the swell seemed like miles apart.

3. No pedalboard.

4. Because the setup wasn't quite right for me I was starting to get my old, old problems - bad back.

Back onto eBay I went...

First thing to address was the speakers. At the time I wasn't so flush so I didn't want to spend more than £100 or so. I found (brand new) some Roland Edirol MA-150 studio speakers. FANTASTIC pieces of kit for the money. Wired them up and instantly the whole thing sounded much better.

The keyboard stand I simply had to live with as for the short-term there wasn't a sensible solution as we'd just decided to put the house on the market. With that in mind, in our naivity we thought the house would sell by the end of 'Murder She Wrote' so we tidied up by moving the grand piano out of the living room (very small house/very big piano doesn't really work when you're getting house viewings) and the basic organ set-up had to be pretty easy to take apart and hide away to reclaim the spare bedroom it was living in.

After a few weeks I discovered http://www.classicorgans.co.uk/ . Wow, they have two manual setups from reclaimed organs. That means that at least part of the keyboard stand problem would be resolved. I gave them a nudge and started my longterm dealings with Ron Coates who runs the show. Fantastic and really helpful bloke whom I'd highly recommend. He sold me two keyboard stacks. No, not two keyboards - two keyboard stacks which means four manuals in total. I never do things by halves tha' knaa! I wanted to have as much practical input in building the organ so I bought the computer hardware from him and rapidly learnt how to solder.

So here I was with four keyboards that were being recycled from older instruments, which I wholly approve of. Why get new when you don't really have to - especially if you're going to be bastardising it regardless? After hours of wiring up the solder connections and working on the PCBs (Printed Circuit Boards, no less... notice I was becoming technical) I had four manuals that eventually were up and working.
Now, what do I do about a pedalboard? Oooh, look, there's one. Already midifyed too. No-one's bidding on it. How strange. I'll stick a bid in. Ooh, I've won it. BUGGER, where do I store it ? The house was still on the market and we were getting a trickle (and I mean a trickle) of viewings so a great big radiating concave 32 note pedalboard strewn about isn't a good look. The garage wasn't an option as by that time I had my boudoir grand piano in there (6ft 2") and a recent purchase of a 9 foot concert grand piano as well as several hundred books. Hmm, won't go in there then. "MOTHER!!! Are you home on Tuesday?" "Yes, why?" "Oh, that's good, you're getting a delivery for me. Will you keep hold of it until it's convenient for me to pick up please?" "Yeah, of course." So, the pedalboard stayed in her hallway (she couldn't move it anywhere else!) for two years!

Two years since putting the house on the market we still hadn't sold so I thought, "Sod it. I'm going to build that organ." I gathered together all of the bits that had gradually become stored out of the way and laid them out in front of me. I went to my mother's house 90 miles away to collect the pedalboard that would fit in neither of our cars... One of them was my Rolls Royce and it wouldn't even go in the boot in that!!! So out came the precision instrument... A hammer. I unscrewed all of the screws that could be unscrewed, removed the pedals and gave each corner a good knock. It all came apart with no damage at all. I brought it the 90 miles back home (yes, it's the same distance back) and brought it into the house to reassemble. It looked great. And still big.

We plugged the pedalboard into the laptop, put on Hauptwerk and played bottom 'C'. Nowt happened. I worked my way up the pedalboard until I got to the 'F' and then it started to go up the rest of te scale no problem... Apart from it being a major 4th out of sync. ie the 'F' on the pedalboard was showing and playing 'C' below. After lots and lots and lots of faffing about over the course of weeks I came to the conclusion that I'd found the reason why the bloke was selling it! It wasn't a problem with MidiTzer as I just independently transposed the pedalboard but I was unable to find a way to do that with the Hauptwerk. I gave Ron Coates a nudge and he sorted me out with a new PCB for it, out came the soldering iron again and 'et voila' I was off... Apart from I didn't have an organ bench...

I think at this point you realise that there's always something else I want.

EBay yet again. I discovered someone was selling a hideous old Livingston organ but without the bench. I let the auction run and saw that the organ sold for £1 (a quid!). Whoever bought it even for that was ripped off in my opinion. I used to play the exact same model every Sunday over in Hartlepool and by the time it was got rid off there was only one manual working and none of the 'F's on that manual, or the lowest octave were working. None of it repairable. ANYWAY.... I gave the guy who was selling the organ a nudge and asked if he had the bench. He had. I asked what he wanted for it. I offered him £20 and he not only sold it to me but gave me back a fiver 'cos he thought I was paying too much. Needless to say, I KNEW I was getting a bargain so shut my gob and drove back across the low-lying Cumbrian Fells the short distance home.

So now I had the manuals, the pedalboard, the bench, the programme and what else? Hmm, now what happened to those two touchscreens I bought off eBay when I first got into this? Oh, they're in the loft. Up I went. They had originally been part of some sort of fruit machine game that you needed a touch screen for. I wired them up. Both faulty. Oh well, £100 wasted. Never mind. Into the bin they went. Online, two brand new fantastic 19" widescreen touchscreens with plenty of change out of £350. ALWAYS do a bit of bartering. I did pretty well out of that deal as the asking price was £250 each.

Hmm, how do I get a console started? I really don't want to build one as we'd STILL not sold the house and I was very aware indeed that we'd still be dismantling the setup if we had a viewing (we'd reduced the asking price by 15% of the original price by this point). I did a bit of research online and read in a really obscure article that if you're lucky you can get the right size thing at Ikea. I'm an Ikea virgin and after my first time there with this purchase I'm thrilled to report my planned celibacy! I hated the joint. However, I DID get what I wanted. We got a large table top for about £35 after taking a smaller one, wandering around the warren to the checkouts and thinking that it was too small. And, what was great 5 individual adjustable table legs. I think in total it cost me something like £70 for the lot + fuel to get there of course. our nearest Ikea is 50 miles away. Got home, a leg at each corner and one in the middle of the back longside just to add a little extra support. I did that as the manuals are heavy. It fitted like a glove. The pedalboard fits very neatly under there and the manuals sit on top with enough room either side for the touchscreens to sit perfectly. It really did look designed for it.

The whole thing can be dismantled in its entirity and shoved in the garage (on top of the heavily, heavily padded and covered concert grand) in 30 minutes. Open the double bed-settee and do a bit of jiggling of the furniture and in 1 hour it's back to a very attractive spare bedroom rather than an organ room!

At present, though, the organ is very much an ugly duckling. It very much reminds me of a Victorian Skeleton Clock. It has all the same bits as the really higly decorative and attractive ones but is only showing the rough basic structure that's needed. For the time being that really is how it'll have to stay.

When (IF!!!) we sell and get a larger house, the ideal plan is for us to have the space for several reception rooms. Ideally we'd like a living room, dining room, music room and a library. I'm sure that with some juggling a library could easily be the music room as well as to be honest practically all of the books in the house are mine (have a bit of a thing for books - can't resist buying those either!) and around 25,000 individual pieces of music all of which need to be kept handy. If the music room and library were combined that, although ideal in theory would be a pretty tight fit... especially as I'm really, really, really hoping that I just might be able to bring my 7ft harpsichord home from work although I doubt that'll happen if I'm being realistic. So, with the tight-fit situation in mind I thought about integrating the organ into a library so having the console and shelves around it all as one huge piece of furniture. By doing that I can also have as much access space for the guts of the organ by just having a couple of cupboards underneath and beside the organ that will indeed look like they belong there especially if I build them into a continuous feature. You know, 7ft library shelves with low cupboards all the way around. Perfect. How the hell we'll get the two pianos, the organ, a library of about 28,000 pieces of music and books combined and potentially (but still very unlikely) harpsichord into one room I'll never know but hopefully that's where a dining room will come in... Maybe that can double up as a library instead! Ooh, didn't think of that!

The organ saga still isn't finished though...

All of the setup is now really marvellous but there is STILL something missing. Expression or swell pedals. I'm really missing them. Google search came up with a guy over the big blue pond. After buying something from him (I can't remember what but I'm sure it was hardware of some kind) I happened to mention swell shoes. He asked what type I wanted and I said ideally Allen. I was in luck. He had 6! None of them had the potentiometers on them so they were literally just the swell shoes but I got the lot for... wait for it... including postage from Canada... $75 at the time that was about £48. BARGAIN!. I got in touch with Ron Coates again who is right at this minute doing the PCBs for me so that I can get it all rigged up. Hopefully by early to mid December I'll have probably four shoes set up. I'll keep the other two for the organ at work!

I really want wooden keys rather than plastic ones. A quick shufty on eBay (again but I do have 100% rating) got me a two manual keyblock for £90. They're for future reference as I'm planning on building a second organ for my office at work. Probably just a pretty basic one that I can move about as it'll be very useful for concerts that we do there. I'll need another computer, pedalboard, speakers.....

I've kept a moderate eye on what I've spent. It really does mount up over time but you must bear in mind that it has been over the course of two years with £50 here, £90 there so you really don't notice you've spent it. I'd say that a realistic estimate is £2,000 I'm anticipating spending £500 on getting a really nice console sorted out, another £300 for the toe studs and the thumb pistons (although I've already got the PCBs, again, courtesy of Ron). £800 on a computer specifically for the organ, and another £300-£400 on further speakers.Yes, it's a LOT of money, especially as I've not even bought the software which is around £400. Each further instrument you purchase is a few hundred quid (or more).

I'm not turned on by plasma tellies, or brand new top-of-the range cars. I don't have any children, I earn a good wage with a decent disposable income so I feel that it's worth every single penny. When you look at the 'off-the-shelf' digital organs that will have the same features that mine'll have you'll be looking ar somewhere in excess of £20,000. OUCH!

What's the best bit of it all? That's easy. I get to learn to play the organ again without the joy of freezing cold fingers, feeling heavily leant on to play for services, I have the joy of being able to access the best organs in the world with the press of a button, I can play harpsichord, harmonium, romantic, baroque, Scandinavian or theatre organs at will and all from the comfort of home.